V3 Documentation
Requirements
Program can only be run on computers running Windows Vista or higher with .NET framework 4.5 or above.
Apparently runs without problems on older .Net version after an error message? Vista or higher has no compromises.
Installing/Uninstalling
Since the program is not really installed at any point it does not need to be uninstalled either. It is just a question of placing and deleting the files. The program is downloaded in a .zip file. Inside the .zip file are just one executable, a readme file and the terms and conditions file. Just place the files wherever you like and run the executable.
"Uninstalling" is just as simple. Just delete the files and you are good to go. Do note that the settings are saved separately and can be found and removed using the guide below!
Program settings are saved in the users files. Lets say Windows is on C: drive. Then the programs settings would be at "C:\Users\<USERNAME>\AppData\Roaming\Degath's Ducker v3.X.X\" where <USERNAME> is replaced with your username. AppData folder is hidden by default but can be made visible from the Folder Options menu under View tab or directly accessed by typing %appdata% in the file explorer address bar. Degath' s Ducker folder can be deleted at any point for whatever reason but the program will reset to default settings.
Will try to add an installer/uninstaller at some point to make things easier.
Main Window
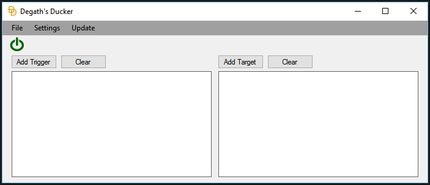
This window may be different if you have already created triggers or targets. In those cases each list may have one or more items according to setup.
|
This is the window which is visible when the program starts. It contains the menu items at the top in addition to buttons for On/Off control, adding triggers and targets as well as clearing each list from all items.
Menu
Power button (Replaced by On/Off text on top bar)
Add Trigger/Target
|
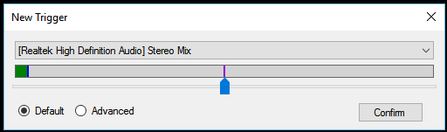
New trigger
Tips!
Please note that new audio sessions will not appear in the drop down menu while the New Trigger window is open. You must close and re-open the window if the session of interest is not visible in the list. The advanced settings contain Peak gain, Peak smoothing and Duck settings. These are all discussed in detail below. The default settings can be found in the program settings and will be used for every session where the default settings are selected. |
This is the New Trigger menu if the user would select to use default settings. The advanced settings will be discussed later with more detail.
Drop down menu contains all active audio sessions from which you can select the one you would like to trigger the ducking effect on other sessions. The bar below with the green, blue and purple parts is the Peak bar.
Below the Peak bar is the Threshold slider. |
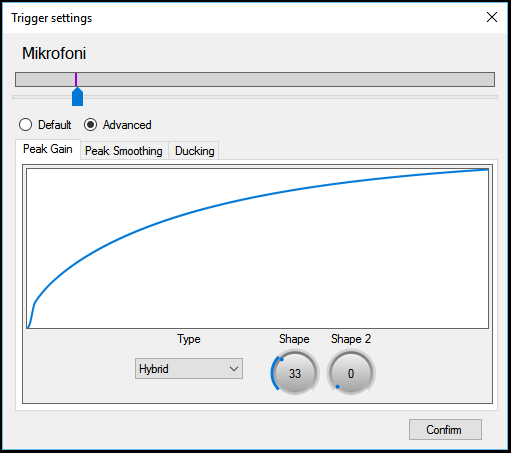
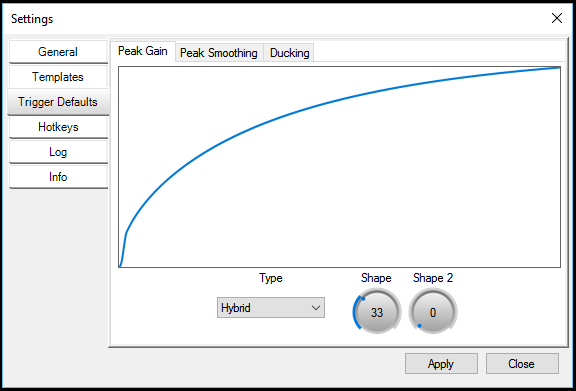
Peak Gain
Tips!
Peak Gain with the other advanced settings can be found in several places in the program. They always work just like explained here. Remember to confirm or lose all changes! |
Peak gain is used to adjust the real peak of the source audio to better fit our needs. Peak adjustment allows easier threshold configuration.
These advanced settings may not be always easy to understand and lack of tooltips and labeling doesn't make things any easier. Regardless I will try to explain each as clearly as I can. Generally speaking the Peak Gain takes the real peak and converts it to a different value according to the blue line in the graph. The real peak is something between 0 and 100% and lies somewhere at the bottom edge or the x-axis. From that value you can imagine a straight line upward to the blue line. The point of intersection defines the calculated value. In this example at almost all points the calculated value is greater than the original and as such increases the perceived peak. The drop down menu which in this case reads Hybrid contains other possibilities:
Shape and Shape 2
|
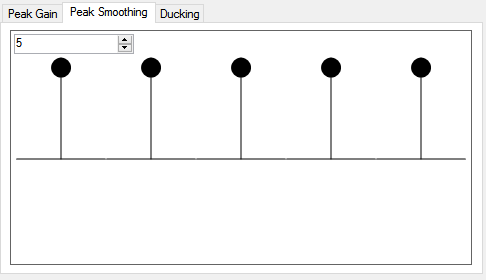
Peak Smoothing
|
This is maybe the most complex part of the program although probably unnecessary for most. This menu contains 1 - 100 sliders each of which represents a coefficient in a FIR filter. The example in the image is basically averaging filter which takes the last five real peak values and uses their average as the current peak. This of course is still modified by the Peak Gain.
Wiki: Finite Impulse Response Generally an averaging filter works for most. More coefficients make the peak slower to react to any sound. Test to find a good amount for you (I like 5). |
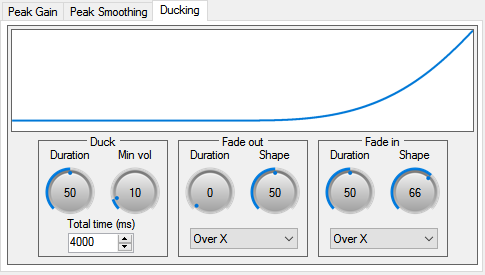
Ducking
|
Visually most complex menu in the program but really intuitive once you get to fiddle around. This menu controls the ducking effect which takes place in the target sessions when the set threshold is exceeded.
The graph shows the level the session(s) will follow from left to right after the trigger has fired. All durations are proportions of the total time. If all are given the same value, each will last 1/3 of the total time. If one is 10 and others 45 the sum would be 100 and each in this case would be identical to the percentages of the total time they would last. Duck
Fade out (Beginning/Left part)
Fade in (End/Right part)
|
New Target
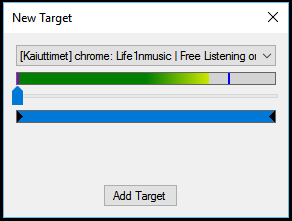
Tip!
The volume arrows can be used to adjust the volume by dragging. Slide the right pointing arrow to right in order to increase current or minimum volume and vice versa. |
This is the New Target menu which is still under some work. Additional features will be added at some point in the future.
Drop down menu contains all active audio sessions from which you can select the one you would like to be ducked when the conditions are met. Peak bar and Threshold slider just like in the New Trigger menu. In this case the threshold must be exceeded by the session peak before the ducking can take place but won't in itself trigger the event. The blue bar below the slider is the volume control for the selected audio session.
|
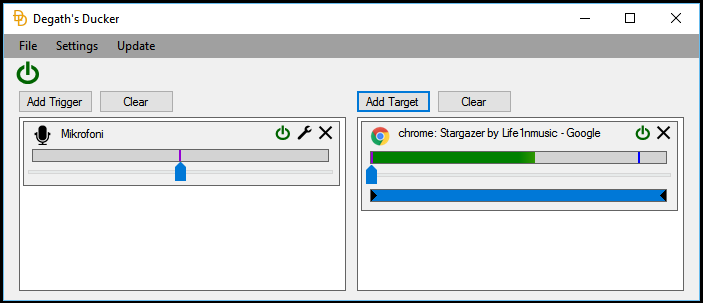
Main with a Trigger and a Target
|
The main window might now look something like this. There is a single trigger which in the example is the microphone. There is currently no peak and the threshold is set at 50%.
On the right there is a target which in this case is Google Chrome playing some music. There is a significant peak and the threshold is set to zero and thus also exceeded by the peak. There are no volume limitations set for this target. Controls visible in the trigger/target:
|
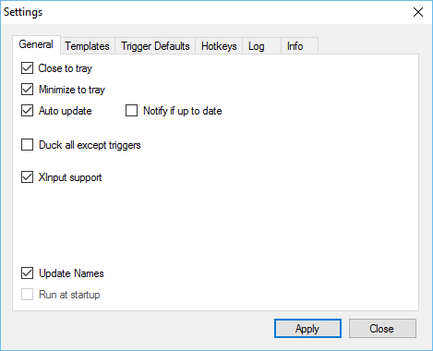
Settings - General
|
Close to tray - Closing the program using the top right hand corner button minimizes the program to the tray instead of closing it.
Minimize to tray - Program is minimized to the tray instead of taskbar. Auto update - Checks for updates at program startup Notify if up to date - If auto update is selected and the program is up to date, a popup will still be displayed. Does not effect the popup if there is an update available. Duck all except triggers - Ducks all audio session and input devices that are not selected as triggers whenever a triggering event happens. XInput support - Allows the use of Xbox controller hotkeys. If unnecessary for you keep it unchecked. Update Names - Updates audio session names. Song and video names, browser titles etc. Applying saves changes of all tabs at once and also closes the settings window. |
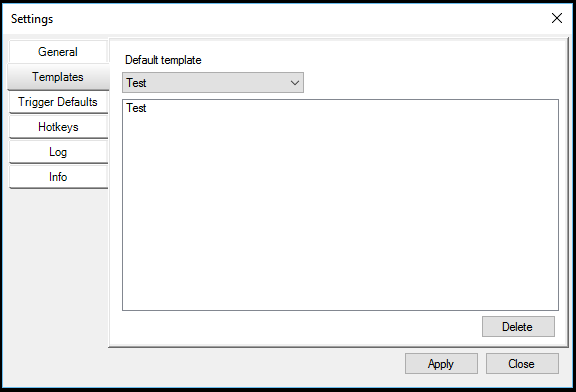
Settings - Templates
|
Here you can select the template which will be loaded at startup from the drop down list. Also deleting of existing templates by selecting from the list below and clicking delete.
Applying saves changes of all tabs at once and also closes the settings window. |
Settings - Trigger Defaults
|
These settings will be used for all sessions which have the default settings selected.
Applying saves changes of all tabs at once and also closes the settings window. |
